
Detailed explanation for multiple heal builds based on different playstyles
Healer is a supporting role in party based content. Remember, you are running with other players so try your best to improve your character and skills. It is disrespectful to your party members, who are actually doing their very best ability to play their chosen role, if you can not even heal properly. There are three job you need to do as a healer:
- Survive – Yes, you need to survive first if you want to heal your teammates. A dead healer is a useless healer. You can achieve this by positioning yourself correctly in combat and investing in defensive stats.
- Heal – In Neverwinter, there is nothing that can give the tank and dps a self-sufficient heal. All the healing potions have long cooldown durations and it is the reason why a healing class is there in the first place.
- Prevent your party members from dying in combat – Always be alert in combat. Constantly check your party’s HP bar. Use any buff/de-buff if you have it to mitigate the mechanic damage. Do your best to keep them alive.
But if they die because they are not doing mechanics properly or they run ahead of the tank in a dungeon, let them be. We can only heal the HP bar, we cannot heal idiocy (yet). Take note that everything here is up to you to decide, except the one I mark with (priority). We probably run different types of content everyday so build your healer according to your own situation and playstyle.
Race
Aasimar is the BiS race for healer class but for players who have not unlocked it you can choose one of the following races which give almost equal bonuses – the Metallic Ancestry Dragonborn, the Dragonborn, the Wood Elf, the Sun Elf and the Moon Elf. A point to note here is that the Dragonborn race and the Moon Elf race can be purchase for zen. While the Metallic Ancestry Dragonborn costs about an average of 2 million Astral Diamonds and the other two races are free to play.
Aasimar
- Celestial Superiority – Your power, outgoing healing, incoming healing, defense, and maximum hit points gain a bonus 2%.
- Celestial Presence – Grants all nearby party members a 2% increase to maximum hit points. This effect does not stack.
Metallic Ancestry Dragonborn/Dragonborn
- Dragonborn Fury – You gain a bonus 3% critical strike and 3% power.
Wood Elf
- Elven Accuracy – You gain a bonus 5% critical strike.
Sun Elf
- Inner Calm – Your action point gain is 5% higher than that of other races.
Moon Elf
- Wanderlust – Your action point gain and stamina gain are each 3% higher than that of other races.
Ability Scores
The main ability score for a healer is Wisdom because it provides outgoing healing. The secondary can either be Charisma for forte and recharge speed or Constitution for action point gain and hit points.
Stats Priority
Since the combat changes, the game is more well-rounded in that the defensive ratings are equally as important as offensive ratings for the healer to not only be efficient but also survive.
Offensive Stats
- Power – Increases your healing.
- Critical Strike – Increases the chances that you land a critical hit.
- Critical Severity – Increases healing done on a critical hit.
- Outgoing Healing – Increases the amount of healing you give from healing abilities.
- Forte – This stat provides a boost to your divinity regeneration and critical severity.
Defensive Stats
- Maximum Hit Points – Your total item level * 10 and healer role gain a bonus 10% base HP.
- Defense – Decreases your damage taken.
- Awareness – Decreases your enemy’s damage when being attacked from combat advantage.
- Critical Avoidance – Decreases the damage of a critical hit landed by an enemy.
Boosts
- Action Point Gain – Increases the rate at which you gain action points
Powers
As a Cleric healer divinity management is the most important aspect, so blindly spamming encounters will not help anyone. Understanding the tooltips and choosing the right one based on what the party content requires is very important. For example, if only one member in your party is low using healing word is a waste of divinity. Can simply heal with the At-will Soothe or bastion of health if the party member is already not tabbed and for dire situations, Intercession. A general tip is to ensure you keep a check on your divinity meter and make sure it never drops below 20% and as you gain experience, can set that bar to 50% threshold.
At-Will


Encounter


Daily


Class Feature


Feat


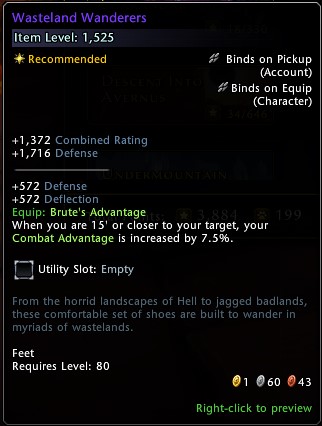
Equipments
There is a lot of gear in Neverwinter that give different types of bonuses. I suggest you to choose the gear based on bonuses instead of stats because they have more impact when building your character. Some of the gear are BiS due to overpowered bonus stats or no other viable option but, you can use whichever you prefer as long as it gives the stats that actually contribute to your heal and survivability. Small tips for choosing gear:
- Only equip 2/3 gears that give power bonuses. E.g., Ring of Fallen Power, Divine Arm, Lion Arm, Greaves of the Lightguard.
- Wild Storm Elixir and Superior Flask of Potency +1 are cheap potions that give 17.5% critical severity. Make sure to consider this information while building your character so you don’t over-cap the stats.
- Since there are no gears that give power percentage without lowering the item level dramatically, so try to get gears that give critical strike percentage. E.g., Goristro’s Horn from Tier 1 hunt and Bone Devil’s Ribcage from Tier 3 hunt in Avernus. Note: The Goristro’s Horn bonus is a little harder to utilize to the maximum.
Primary Artifact
If you aim to do end game content such as Tower of the Mad Mage or Zariel’s Challenge, try to prepare at least 3 buff/de-buff artifacts. Here are some of the cheap artifacts to buy on the Auction House:
- Heart of the Black Dragon
- Halaster’s Blast Scepter
- Wyvern-Venom Coated Knives
- Lantern of Revelation
- Token of Chromatic Storm
- Tiamat’s Orb of Majesty
- Charm of the Serpent
Boons

Companions
In mod 20, there are a lot of viable companions to choose from. You can use whichever you have or can get to make your summoned. For endgame party-based content, I highly recommend to go with the companion that can apply buff for party or de-buff on enemy (e.g., Spined Devil and Stalwart Golden Lion). As for active slot, try to get companions that give power percentage such as Deep Crow Hatchling and Alpha Compy because that is the major stat affecting your heal. For purple slot, there are 6 good option for personal buff or enemy de-buff.
- Potency – Increase your power percentage
- Armor Break – Reduce an enemy’s defense
- Blurred Vision – Reduce an enemy’s accuracy
- Dulled Sense – Reduce an enemy’s awareness
- Slowed Reaction – Reduce an enemy’s deflect
- Vulnerability – Reduce an enemy’s critical avoidance
Mounts
As a healer, our next priority other than healing is giving buff to party members or applying de-buff on enemy’s mechanic in dungeon or trial. Mount combat power is one of the biggest contribution during artifact call, especially in a properly made party that synchronize the timing together. But due to high demand and low drop rate, all these mounts are extremely expensive. Here is the mount that players use for buff/de-buff:
- Swarm
- Armored Griffon
- Armored Bulette
- Warpainted Tyrannosaur
- Commander Tyrannosaur
- King of Spines

Lastly
If you noticed, I did not mention anything about enchantment, insignia, and runestone because they all depend on your own stats. Second reason is we only need power, critical strike, and critical severity in offensive stats, since there are so many gear that give you power rating in bonuses and cheap potions that give critical severity.
My Cleric’s Heal Build for example if need
My playstyle is daily spamming, so I focus on action point gain. Take note, this is my ToMM/ZCM run loadout.


P.S. If I actually want to go min maxing style. My stats in combat are:
- Power 90% – Using Potency, Watermelon Sorbet, Forger’s Box Blessing
- Critical Strike 90% – Assuming Goristro’s and Devil’s Ribcage fully proc +5% critical chance overload
- Critical Severity 90% – Bone Devil’s Ribcage and Superior Flask Potency or Wild Storm Elixir
- Outgoing Healing 82.7% – Class feature, Lionheart weapon, Blessing of Light, weapon artifact modification. 87.7% if using Tiamat set
- Maximum Hit Points 730k – 5% HP overload, Lulu as summoned, VIP buff in full party